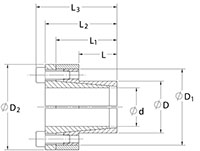
Single-taper, self-centering design with mounting flange for use in through-bored components with smaller pitch/outside diameters. Mounted component remains fixed axially during installation.
View Catalog Page
View Catalog Page
Unit of Measure
Specifications
Shaft Size |
N/A 38 mm |
d |
N/A 1.496 in |
D |
N/A 1.969 in |
D1 |
N/A 2.598 in |
D2 |
N/A 2.835 in |
L |
N/A 1.260 in |
L1 |
N/A 1.850 in |
L2 |
N/A 2.126 in |
L3 |
N/A 2.362 in |
Mt |
N/A 625 ft-lbs |
Fax |
N/A 10,024 lbs.F |
Ps |
N/A 14,107 psi |
Ph |
N/A 10721 psi |
| DN1 | N/A 2.510 in |
Locking Screws Quantity |
N/A 8 |
Locking Screws Size |
N/A M6 x 18 |
Ma-Locking Screws |
N/A 13 ft-lbs |
Hub Machining Tolerance |
N/A 0.002 in |
Shaft Machining Tolerance |
N/A -0.002 in |
Weight |
N/A 1.50 lb |
UPC Code |
N/A 044861077733 |
- 1 Minimum hub outside diameter based on a Pressure reduction Factor of C=1.0 and hub material with tensile yield point = 45,000 psi. For details see Hub Strength in Technical Information.
